Showing posts with label Miniatures. Show all posts

Thursday, September 04, 2014

Blunderbuss Pirate


Though it is never far from my mind or from my gaming table, pirates and Legends of the High Seas have taken a backseat to other projects lately.  I absolutely love the ruleset and the genre but I have been unable to give it the attention I would like over the last six months.  The winds of change are ablowin' however.  A scurvy band of pirates have been seen scouting out the Caribbean town of Port Largo in recent weeks.  The townsfolk know that it's only a matter of time before they become brazen enough to take a prize leaving port.  Yep....I feel a LotHS game brewing!


To add to the denizens that call Port Largo home, I painted up this nifty model from Black Scorpion Miniatures.  Black Scorpion has been my "go to" company for miniatures of the piratey nature for years now.  I've always been pleased with the quality of their products and this blunderbuss wielding rogue is no different.  He is one of the four miniatures offered in the Rogues 1 blister pack.  Though I have yet to paint the other three minis, I can say that the quality of the others is as good as this one.


Since I seem to be giving a mini review (pun fully intended) I must add an important detail.  All of the pirate models I own from Black Scorpion (and I own them all except for the Pirate Girls line) are metal.  It should be no secret to regular readers that I absolutely hate resin.  When I found out that Black Scorpion was switching to resin I hurried to complete my collection of pirates by purchasing my missing figures in metal before they disappeared.  So while I'm giving two thumbs up for the metal sculpts, I cannot say the same for the resin versions.


The first parts I painted on this pirate were his hair and scarf.  Before I had decided on a full color scheme, I knew I wanted both to stand out.  I chose a light auburn for the hair and a garishly bright yellow for his scarf.  For the hair I used my standard color palette for red hair:  Auburn Shadow (09241), Carrot Top Red (09242), and Highlight Orange (09242), all from Reaper.  For the scarf, I tried a new technique for shading yellow.  I painted the scarf in Sun Yellow (09008) and let the pure color stand for the highlight.  I then mixed in small amounts of Imperial Purple (09023) for each successive shade.  I was very pleased with the results.  Instead of powdery looking light yellow highlights and dirty shades, I ended up with a very clean color graduation.  I'm currently working on an elf maiden in a yellow dress.  I plan on trying the same technique to see if the results are as good on a larger surface.  Updates to come.....


The green shirt was a huge problem.  For one, I kept getting small dots of green paint on my freshly painted yellow scarf.  Painting over a dark color with such a light translucent one was no easy task.  The main issue was with the highlighting though.  I used the Mossy Green triad from Reaper.  When I began mixing in the highlights the paint turned chalky.  No matter what I tried I could not get the color to play well with the others.  I mostly fixed the issue by glazing a darker green over the highlights but the evidence is still on the shirt if you look closely.  Oh well.  I don't think I'll be using that combination again anytime soon.


So another new pirate is completed.  Now I need to choose a name (something Irish would do nicely I think) then decide which crew I want to add him to.  I'm thinking this weekend would be a great opportunity to field him for the first time and see what that blunderbuss is capable of.  Will he survive his first raid?

Thanks for reading.

Monday, June 09, 2014

Meriadoc Brandybuck: Fictional Dioramas & Functional Usage

File this miniature under the 'better late than never' category.  I started this particular Meriadoc Brandybuck mini well over a year ago for a Hobbit Day diorama I was working on at the time.  Hobbit Day 2012 came and went with only Bilbo Baggins complete, so I abandoned Merry and onto the queue shelf he went.  Months later, I picked him up again with the goal of finishing the now near mythical diorama for Hobbit Day 2013.  That day too came and went without a completed miniature. Back on the shelf he went.  Finally, I was able to finish him last week.  Maybe, just maybe, Hobbit Day 2014 will see a completed diorama.


The planned diorama was to depict Merry spying on Bilbo in the Shire.  In The Fellowship of the Ring, Lobelia Sackville-Baggins approaches Bilbo from a distance.  Not wanting to deal with her antics, Bilbo quietly slips on his magical ring and disappears until Lobelia has safely passed him by.  Bilbo then reappears and goes about his day, oblivious to the extra company hidden beside the road.  According to the text, this event was the downfall of Bilbo's well-kept secret and a catalyst to forming the 'conspiracy' that was finally unmasked years later when Frodo tries to leave Crickhollow without his friends.


When completed (if that ever happens), Lobelia will be positioned near the bottom of a small rise continuing her walk down the lane towards Hobbiton.  Bilbo will be positioned in the lane some distance behind her, holding his trusty ring in the palm of his hand with an obviously pleased look upon his face for having avoided the dreadful creature.  Merry will be off the side of the road hidden amongst the brush and grass, not quite believing what he just witnessed.  If done correctly, I think the diorama will depict the scene from the book quite faithfully.


This version of Merry (from the Merry and Pippin vs. Grishnákh blister) is the perfect mini for the job.  He is already kneeling/hiding so no conversion was necessary.  More importantly, the look upon his face, while originally sculpted to show fear of Grishnákh, seems to show surprise as well....perfect for my project!


I'm a firm believer of double-duty miniatures.  As such, I did not want to paint and base Merry solely on the description of the Shire encounter.  I also wanted to be able to use the model for additional encounters.  I painted Merry in his Fellowship attire, including the Lothlorien cloak.  The look was flexible though.  To me, the color scheme could just as easily fit the well-tended fields of The Shire (for the diorama) as well as the wilds of Middle-earth (for gaming in general).  The main alternate use of the mini would be for its intended purpose.  The encounter that the blister was meant to depict occurred in Rohan near the eves of Fangorn Forest.  It was easy to adopt the imagery Peter Jackson used for Rohan in the movies and tie it in with The Shire with just a little stretch of the imagination.  The base could be cultivated winter wheat or natural grassland, both of which work for either use.  Now, instead of just sitting in a diorama, I can pull him out and use Merry on the game table.

There is one part of the  model that would preclude Merry from being in Rohan (as depicted in the book and movie) but it takes a sharp eye to find it.  I'll leave that one detail open to guesses in the comments section.


Though the time frame of completion may indicate otherwise, I actually enjoyed painting this miniature.  This sculpt predates GW Finecast and represents the good ole' days when GW LotR SBG products were worth the money.  The lines are clean and the details crisp.   If I remember correctly, I had very little prepping to complet before priming and painting.  That's never the case with Finecast miniatures.  Though I have plenty of GW LotR lead still to paint, working on this miniature made me miss the days when I eagerly awaited the next issue of White Dwarf to see what LotR goodies were coming out the following month.


Ending Note:  I apologize for the photos.  I tried a new lens on my camera for this session.  While the lens does a great job in other areas, close-up photography is not one of them.  The photos look very fuzzy and not at all sharp.  I could have retaken the photos but I was feeling much too lazy, just like a fat hobbit!


Don't forget to provide your guesses below.  I wonder how long it will take to spot it.  As always, thanks for reading!

Saturday, May 17, 2014

Dark Sword Miniatures G.R.R.M. Masterworks Kickstarter Loot

I received my Kickstarter loot from Dark Sword Miniatures on Monday.  The box actually arrived on Saturday but I wasn't home to sign for it so I had to wait.  After getting my greedy hands on the package and ripping into the blisters, I found that the wait was definitely worth while.  The new G.R.R.M. Masterworks miniatures are absolutely beautiful.  I received 28 total miniatures (exact contents are listed at the bottom of this post).  Unfortunately I had to pass on most of the add-ons because I already had many of the selected miniatures in my collection (not a bad problem to have).  Overall I still got a great deal on the minis though and I can't wait to get my brush on them!


Just like the previous Kickstarter by DSM, Jim and his crew certainly had their act together.  Immediately after the project ended I received a backer survey in the mail.  I submitted my choices then waited.  The wait was not long however, unlike many other Kickstarter projects.  The time between the end of the fundraising period until I received my backer's reward was less than 2 months.  The estimated delivery date was right on target.  Well done guys!


In addition to the great miniatures, I also received this nice document signed by Jim Ludwig (the president of DSM), Tom Meier (the sculptor) and Mr. George R. R. Martin himself.  Of course the miniatures were the reason I backed the project.  Little extras like this however, prove that the company cares about the hobby and about their customers.

Here is everything displayed all together for a photo.

Once again I am very happy with both the company and their Kickstarter project.  I will not hesitate to back any future efforts.


Reward Contents

Pack 1 of 10
  Jeor Mormont
  Davos Seaworth
  Arianne Martelle

Pack 2 of 10
  Viserys
  Brynden Tully
  Limited Edition Sorceress

Pack 3 of 10
  Maester Pycelle
  Barristan Selmy
  Chataya

Pack 4 of 10
  Prince Joffrey
  Male & Female Minstrels

Pack 5 of 10
  Mounted Khal Drogo

Pack 6 of 10
  Mounted Ser Loras Tyrell

Pack 7 of 10
  Lady in Waiting
  Septa
  Brothel Worker

Pack 8 of 10
  Scribe of Westeros at Writing Desk

Pack 9 of 10
  Cocky Young Hedge Knight x2

Pack 10 of 10
  Brothers of the Knights Watch

Add Ons
  Exclusive Variant Sculpt of the Scribe of Westeros at Writing Desk
  Kev & Tre Tribute Sculpts


Anyone else back this project?  If so, are you happy with the quality of the miniatures and the speed in which the rewards were delivered?

Thanks for reading!


Friday, April 18, 2014

DSM Dragon Diorama WIP: Of Bases and Coins

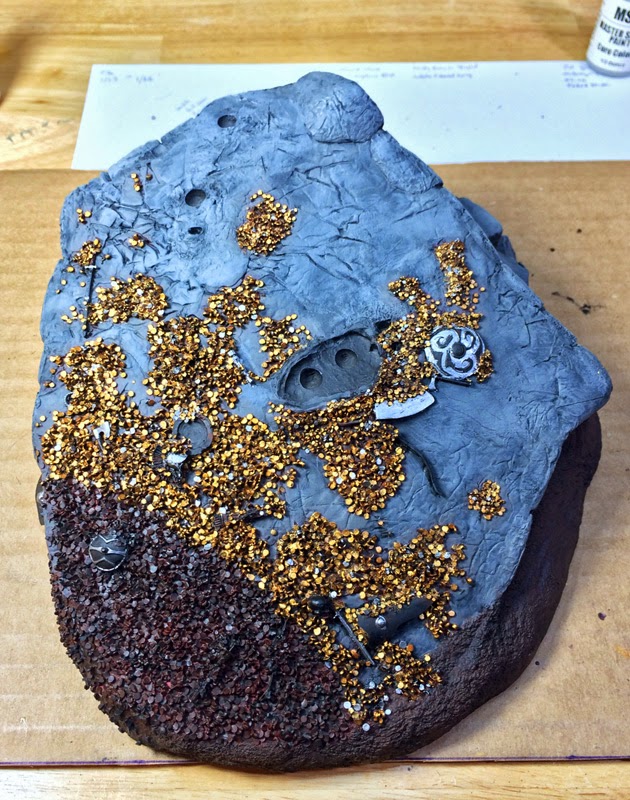
Work continues on the base of my Dark Sword Miniatures Elmore Dragon Diorama.  The work has been tedious and at times rather boring. But I know I'll be happy with the end result when it is finally completed.  Slowly but surely the treasure horde is coming along.


I've kept to my goal of not drybrushing the coins.  Each coin thus far has been painted separately by hand.  I'm glad I have done so.  Though it may be difficult to tell from these low resolution iPhone photos, the coin horde is quite striking to the eye.  I do have to admit however that I am doing it the hard way.  Each coin, or stack of coins, has to be painted from several different angles.  I usually start with the top of the coin, then I hold the base at eye level and rotate it around, brushing on color where needed.  Otherwise the coins would look two dimensional without their sides painted.  Drybrushing the coins first, followed by the stone gray color probably would have solved this problem.  But I truly think the effect would be much less dramatic. 


As I mentioned a few weeks ago, most of the coins are/will be gold in color.  As you can see in the photos, the gold really does contrast nicely with the gray.  However, to break up the mass of gold I decided to add a few silver coins here and there.  The effect is subtle but does the job nicely.  When I finally get around to painting the assorted weapons and armor included in the treasure pile, the golden mass will be broken up even more.


I've dry fitted the dragon to the base.  Wow!  I had forgotten how massive the miniature megature really was.  The vast majority of the base will be covered by his body while the dragon's impressive wingspan will drape most of the treasure hoard in shadow.  These factors lead me to wonder if I am wasting my time by painting all the individual coins, especially when I will be the only person to really appreciate the detail.  What do you think?


I guess I should get back to painting coins.  I estimate that I'm a little over halfway finished.  Hopefully updated photos will be posted soon.

Thanks for reading!

Friday, March 28, 2014

Nontraditional Goblin Skin Part 2: Old School Edition

Goblins have been on my mind lately.  I know that's an odd thing to say but it is true.  I have been contemplating goblin weapons, goblin society, goblin raiding tactics, even goblin intelligence (or lack thereof).  But mostly I've been thinking about goblin skin.  Several months ago I began a project experimenting with goblin skin color.  I wanted to try different skin tones beyond the usual green-skinned little monsters that seem to be the norm these days.  While I have nothing against 'greenskins' and actually like them for certain aspects of gaming, I wanted to wander off the beaten path for a bit.

My first foray delved into the world of J.R.R. Tolkien.  I wanted a dusky look that fit more closely with the professor's description of goblins in Middle-earth.  For this attempt however, my inspiration came not from Tolkien but from the excitement surrounding the 40th anniversary of Dungeons and Dragons.  I wanted a color scheme that would harken back to the early 80s when I first started playing.  This is what I came up with...


For the miniature I chose a model from Hasslefree Miniatures.  This little grinning goblin is called Dima (HFO007) and can be found in Hasslefree's Orcs and Goblins line.  I liked the semi-old school style of the sculpt and thought he would be perfect for my old school color scheme.

I have a sizable collection of goblins from Otherworld Miniatures that would have served even better for the old school theme I was attempting.  I wanted to save them though until I found the right goblin skin color so that the entire tribe will look somewhat homogeneous.  So for now I will stick with Hasslefree's goblins for experimenting.


Now that I had my miniature I needed to decide on the paints I would use.  To aid in the decision I pulled out my trusty copy of the original Monster Manual and flipped to the well-worn page describing goblins (hmm... I guess I fought many of them back in the day).  On page 47 I found what I thought I remembered.  There, goblin skin is described as ranging from "yellow through dull orange to brick red."  Though the description would change in later editions (sounds like a subject for another blogger post), this was the goblin I had such fond memories of from those long ago days.

Shortly after reading the description in the Monster Manual I remembered a color photo depicting goblins with a similar color scheme.  I wasn't sure where I saw it so I rummaged through my collection for hours.  I finally found what I was looking for.  There, on the cover of module N2 The Forest Oracle, were three goblins with a pretty close resemblance to what I envisioned in my mind.  I then had both inspiration and an idea of the color scheme I wanted to use.  It was time to paint.


For painting the skin I chose a medium brown for a base coat.  I can't remember the Reaper color (maybe Intense Brown??) but it is the equivalent of GW's Bestial Brown.  From there, I started layering in various shades of lighter browns mixed with tints of red, orange, and yellow.  I made particularly heavy use of Saffron Sunset (09247) and Orange Brown (09201), both from Reaper.  Highlighting was accomplished with Saffron Sunset mixed with various shades of yellow.


The rest of the miniature, including the garb, armor, and weapons was painted in rather drab colors to contrast with the skin tone.  Greens and dark browns dominate the color scheme to help highlight the orange and yellow of the skin.  The armor and weapons were heavily washed to knock down the shiny new look that so often breaks the character of this type of monster.  After all, they should look like desperate scavengers and raiders and not like a knight in shinning armor.  With that being said, now that I look at the photos on blogger, I need to go back and wash the helmet a few more times.  It does look awfully shinny.

I am fairly happy with the outcome of this goblin and I think I'm close to finding the skin tone I want to use in the future.  I think I will paint one more goblin and intensify the oranges a bit to see what happens.  Afterwards a final decision will be made and the resulting color scheme applied to my waiting Otherworld Miniatures goblin tribe.

Anyone else use this style on their goblins?  Any comments, hints, and/or suggestions would be greatly appreciated.

Thanks for reading!


Monday, March 10, 2014

Beginnings: DSM Dragon Diorama WIP

It has been said that from humble beginnings come great things.  Well, I'm unsure about the 'great' part but I certainly have started off my next project in a humble manner.  After sitting in an unprimed state for months, I have finally put a layer of paint on the base of my Dark Sword Miniatures dragon diorama Kickstarter that I backed last year.  The excitement of DSM's current Kickstarter project bubbled over and vanquished the painting lethargy I've been suffering through for the last few weeks.


For this project, I decided to start with the base this time instead of the miniature, as I normally do.  Two reasons drove me to this decision.  First, in this case the base is very much part of the miniature instead of just an afterthought.  I will not say that it is the focal point (the dragon obviously serves in that role quite admirably) but for the diorama to come to life and provide the proper backstory to honor Larry Elmore's iconic painting, the base needs to be nearly as impressive as the dragon itself.  To say that I will need to spend quite a bit of time on the base to make it so would be a huge understatement.  The second reason deals with logistics.  The dragon is huge! I do not have the proper equipment available to mount it for painting.  By completing the base first, I can use it to securely hold the dragon during the construction and painting process.  I will just need to be extra careful not to damage or ruin the already painted base while working.


My plan of attack is simple.  I've already cleaned, primed, and thrown down the initial base colors to give me a good starting point.  The dirt/grassy area around the stone was given several coats of a mid-range brown for a base.  I will darken some areas and lighten others to give an overall impression of scattered dirt and rocks.  Much of this area will be eventually flocked with grass and shrubbery so I'm not overly concerned with this particular portion of the model.  The stone however will play a much more important role.  I have an initial coat of Reaper Shadowed Stone (9085) covering the rocky areas.  After a few light washes to bring back some of the detail, I will slowly bring up the mid-tones and highlights with successive layers of Stone Grey (9086) and Weathered Stone (9087).  Then comes the hard part: the treasure.

The coins will take me some time but I'm looking forward to the challenge.  I will not say that I will paint each and every one by hand but I do plan on avoiding drybrushing as much as possible to really concentrate on the detail.  I plan on most of the coins being gold in color for two reasons.  In literature and popular media, dragon hoards always seem to be comprised of gold coins.  It's an iconic image that I do not plan on tinkering with.  Second, even if silver were the preferred color of a dragon's treasure, I would still choose gold.  The gold coins will contrast much better with the grey stone than silver.  I do plan on mixing the treasure up a bit though.  I'll add silver and copper here and there in small patches to break up the golden monotony. 

As a basecoat for the gold coins I chose a deep red - Bloodstain Red (9133) to be exact.  I can't remember where I learned the technique, but basing gold, copper, and brass metallic colors with a deep red will produce much more vivid and rich hues than when applied over black or white.  I use this technique every time and have been quite pleased with the results.  Try it and see if you notice a difference.


So that's it for now.  I have thousands of coins to paint.  I will post another update once I get a little further along.

One last thing though:  today is the last day of the Dark Sword Miniatures G.R.R.M. Masterworks line Kickstarter.  Lots of backer rewards have been unlocked over the course of the drive and the total number of included miniatures is now up to 24.  That's more than double the initial offering.  Plus lots of great add-on deals are also available.  Go have a look at the funding page here before it ends tonight at 11pm (EDT).

Thanks for reading!

Wednesday, January 29, 2014

Aleena the Cleric

A few months ago (wow, has it really been that long?!) I made a comment about how a miniature I was painting reminded me of a certain NPC cleric of my past.  I thought the mini seen below was based upon Aleena the cleric from the Metzer red box edition of Dungeons and Dragons.  Well, it turns out my memory of the 80s when I was a D&D fanatic is not as I thought it to be.  I was clearly wrong with my assumption.  But in discovering my error, I took a fascinating journey of reminiscence and discovery into the past.  Please allow me to share.

The WIP of the miniature in question

My first introduction to D&D was through a strange mixture of the Moldvay Basic set and AD&D.  As clueless preteens we gleefully mixed the two systems into a loose ruleset that guided our adventures into strange lands.  While I have very fond memories of that first set it was actually the Metzer version of the basic set that I spent the most time playing back in those days.  Ahh, the memories.  How can one forget the awesome and terrifying red dragon painted by Larry Elmore gracing the cover of the fiery red box or the beautiful cleric that befriended a lonsome adventurer in the introductory adventure?  That of course is where Aleena comes in.


For those of you who may have forgotten, we meet the blonde-haired cleric shortly after wounding a goblin in a cave.  As we cautiously pursue the fleeing goblin, we come upon her silently meditating in a corner of a cavern chamber.  She is drawn to our high charisma and invites us to join her for a rest.  After instructing us on several aspects of an adventurer's life, the cleric not only joins our expedition but kindly offers to heal us as well (that 16 charisma really pays off).  Aleena becomes a mentor of sorts as we explore the remainder of the caves together but she can do more than just offer instruction.  She exhibits her skill and power as she uses her clerical abilities once again, this time turning the undead ghouls that block our route.  We are beginning to fall in love with this woman!


But our love affair is not meant to be.  Bargle, the roguish magic-user that has been terrorizing the countryside around Threshold slays the beautiful young cleric with a deadly spell.  She falls in battle and no matter what we do, we cannot alter that fate.  We either kill the evil Bargle after making our saving throw or unwittingly aid him while under a charm spell.  Either way, Aleena the cleric is no more.


With either outcome, we do manage to recover Aleena's body and return her to the local church.  Hearts are broken, both in the game and in real life over the death of the cleric.  No matter how many times we play the scenario or what we do, we cannot save her.  The cleric's fate is preordained.  It is with great remorse for her loss that we begin our adventuring careers in the world of D&D.  But with her loss comes wisdom and the understanding that death is real in the game and the hero does not always win.  We are shown just how dangerous the adventuring life can be.  This would have been a profound lesson to those new to the game and perhaps this is why the Metzer boxed set remains so ingrained in the collective memory of D&D players worldwide.


I was reminded of her sad story as I went back to my worn red box to research what Aleena looked like and it brought back so many pleasant memories.  I wondered if others thought the same. I turned to the internet for answers.  What I found there was surprising.  The memory of her death was a topic much discussed. I discovered that many others felt the same way I did about the poor cleric and that the solo introductory adventure and her death remained with many players for years.

But I also discovered that her death was not in vain.  Aleena's fall galvanized the will of the countryside and thousands upon thousands of players rose up in anger to find and vanquish the evil wizard.  Who knows how many adventuring careers were launched by the memory of her fair face and kind demeanor? 

The anger directed toward Bargle was both in game and in the real world.  I found that many who played that introductory solo adventure retained a hatred of Bargle well after the Metzer red box became a collector's item.  For example, as a nod to the intense dislike that players held for the magic-user, Paizo included an adventure entitled Kill Bargle in the very last print issue of Dungeon Magazine (#150).

Some expressed this 'anger' in a more artistic manner as evidenced by the poster and t-shirt seen below.  Gamers from across the world were united in the memory of Aleena and a desire for vengeance.


Visit here for a short video about the "Kill Bargle" t-shirt.

One of the creators of the shirt

In my research I also found out that Aleena may not have perished after all.  I stopped playing D&D in 1987 when girls and cars became more important than dice and character sheets so I missed the future developments.  Apparently Aleena was sighted again after my departure in several TSR supplements.  In 1987 she was given a description and stats in GAZ1 The Grand Duchy of Karameikos as a 12th level cleric along with a note stating that if it were established that she had died in the solo adventure from the Basic set to change her name to Anielle.  In 1994 she was again found in Karameikos: Kingdom of Adventure with basically the same descritpion but with no mention of a possible earlier death.  Though she may have existed for future players, her death and our failure to save her still sits heavily with those who played the adventure before additional supplement releases.

Is this Elmore's new revised Aleena?

Which brings me full circle with this post.  It was the thought of Aleena the cleric that came to mind when I started painting the miniature.  But my memory of her failed me utterly.  My miniature is the wrong class, has the wrong weapon, the wrong garb, and even the wrong hair color.  Hell, the only thing remotely similar is the helmet.  Maybe that was the memory trigger.  Though the miniature does not resemble Aleena as described by Metzer and illustrated by Elmore, the trip down memory lane was definitely worth the mistake on my part.  And really, as in most things in life, it's the journey that counts...not the final destination.

What memories do you have of Aleena and Bargle and do you have a miniature that aligns more closely with her description? 

Thanks for reading!

Monday, December 09, 2013

On the Horizon - December 2013

It has been quite a while since I've done an On the Horizon post (hell, it's been a long time since I've written any posts). I'm not sure why I got out of the habit of writing my monthly work in progress report. Posting what I will be working on for the upcoming month always helped me plan out my projects and get my materials in order.  Doing so also forced me to clean up my hobby desk for photography purposes.  As a final benefit, it was fun to reread my column at the end of the month to see how miserably I failed my plan.

So here we go again as I try to revive my monthly column.  I have changed up the format a bit however.  In the past I would take lots of photos of every mini currently in the queue.  Sometimes that would add up to nearly fifty miniatures.  I can barely paint fifty miniatures in a year so it was unrealistic of me to even partially entertain the idea of finishing more than a few in a month's time.  With the new format, I will only focus on a few models at a time.  The featured minis will be those that are nearly complete or suddenly important to me for whatever reason.

December's queue

As you can see from the photo above, December looks to be a busy month.  I currently have sixty-one miniatures mounted for work on my hobby desk (only twenty-five are pictured) but I will only be concentrating on ten.  If I can finish even half of these I will be pleased with my progress.

First up this month is a special edition model from Dark Sword Miniatures.  I'm a big fan of Halloween, so every year I like to paint up a Halloween specific model to celebrate the season.  This year I chose the 2009 Halloween Witch & Blackcat sculpted by Jeff Grace (DSM7506).  Unfortunately Halloween came and went with the model remaining unfinished.  I'm determined to finish her before the year ends though.  Just like the ones I have done in years past, this is not really a spooky/scary miniature.  Instead it's a rather whimsical model of a witch summoning her spectral servant.


I would say she is mostly finished.  Most of the model has received a base color but only portions have been highlighted and shaded (hat and skirt).  I have chosen fall colors to accentuate the theme I was going for and for the most part, I am pleased with the choices.  I am having trouble with the orange on her skirt though.  I'm fairly happy with the highlights I have added (though I may do one more round) but the shadows are not what I'd like to see.  When I try to darken the shadows I end up with a dirty brownish orange that nearly ruins the effect of the miniature.  I have very little experience working with orange so suggestions from readers would be most welcome!

Trouble with orange shadows


Miniature:  Halloween Witch and Black Cat DSM7506  
Status: Highlighting and shading
Progress:  85% complete


Next is a male mage from Dark Sword Miniatures (DSM4105).  This model first drew my eye due to the simplicity of the lines.  It should be no secret by now to those that visit this blog that I am not a fan of "busy" miniatures.  I strongly dislike all the crap some companies like to throw on to a 28mm piece of lead (or resin or plastic).  Well this mini is the complete opposite and I can't wait to finish him.  I think once completed he will join the ranks of my Level One Adventurers project.

Miniature:  Male Mage DSM4105
Status:  Bascoating
Progress:  20%


If I like the previous miniature for its simplicity then I must like this one for her boobs simplicity as well.  This model comes from Reaper's skirmish game line (Handmaiden of Keskura, Icingstead 14579).  I have never played Warlord and probably never will, but I have purchased several models from that line in the past and have been quite happy with the quality of the sculpts.

All joking aside, I like this miniature for the fluid sense of motion and the facial features (especially the hair).  I knew right away that she would be a redhead but I am still undecided on the exact color scheme for the rest of the miniature.  The basecoats seen above are not set in stone by any means.  Don't be surprised to see something completely different when I finally get around to completing her.

By the way, the base is from Secret Weapon Miniatures.  If you're not familiar with the company you should definitely check them out.  I've purchased several bottles of wash from them and they perform every bit as well as, or better than GW washes.  Plus they have a great selection of resin bases.

Miniature:  Handmaiden of Keskura, Icingstead 14579
Status:  Basecoating
Progress: 35%


This cleric is also fairly simple in design yet she has a striking pose.  This one comes from Dark Sword Miniatures as well (DSM4107).  Once completed, she too will join the ranks of my Level One Adventurers.

Miniature:  Female Cleric DSM4107
Status:  Basecoating
Progress: 15%


I've been gearing up for more Legends of the High Seas action and wanted another model wielding a blunderbuss... so I picked up this guy.  He is part of the Rogues I blister (PIR1) from Black Scorpion Miniatures.  I have purchased and painted quite a few models from Black Scorpion (about 20 I think) but I rarely do so these days.  The company switched from metal to resin two years ago and since then, I have found the quality of the casts fairly poor in quality.  It's a shame...I really liked the pirate and old west lines.  Occasionally metal versions can still be found by resellers online, so if you're interested, keep looking.

Miniature:  Rogue
Status:  Basecoating
Progress: 30%


Readers, meet Dima (HFO 007) from Hasslefree Miniatures.  The entire collection of fantasy models from Hasslefree are wonderful but I'm especially taken with their line of orcs and goblins.  I've managed to collect most of them over the last year.  The first Hasslefree goblin I painted can be found here.  With this particular goblin I wanted to continue to experiment with non-traditional goblin skin tones like I did with the first.  So far I must say I'm quite happy.  If the shading and highlighting continue to work out I'll be sure to post the color scheme once he is finished.

Miniature:  Dima HFO007
Status:  Shading, highlighting, and clean up
Progress:  80%


Next is yet another miniature from DSM.  Although still in basecoat mode, this female fighter (DSM4115) is coming along nicely.  Apart from the simplicity of the model, the feature that attracted me most was her likeness to the cleric that appeared in the intro adventure included in the D&D Red Box Basic Set (Alanah or Alena I think).  It's been years since I've looked at my copy so I may be mistaken with her name and the resemblance, but that's the first thing I thought of when I first saw her.  I think I need to dig out that box and do some research.

Miniature:  Female Fighter with Longsword DSM4115
Status:  Basecoating
Progress: 35%


Everyone should be familiar with this Hobbit.  Why it's Meriodoc Brandybuck!  I started painting this version of Merry from GW's Merry and Pippin vs. Grishnakh blister last year.  He was to be part of a diorama in honor of Hobbit Day 2012.  Not only did I not finish him (or the diorama) last year, I missed this year as well.  I did try however and got pretty darn close to completion.  All that is left is to finish his cloak then add a few more details to his vest and hair.  Maybe I will be able to show him off next year for Hobbit Day 2014!

Miniature:  Merry
Status:  Shading, highlighting, and detailing
Progress: 90%


Lobelia was/is also part of the planned Hobbit Day diorama.  She has languished unfinished in the queue as well but not for much longer.  She has only been basecoated but I think the highlighting and shading should progress rather quickly due to the lack of complexity of her garb and the simple color scheme I have chosen for her.

Miniature:  Lobelia
Status:  Basecoating
Progress:  35%


Finally I come to another goblin from Hasslefree Miniatures.  This is Mikal (HFO 004).  He is very much in an uncompleted state but I had to include him since this miniature is my current "ooh shiny" distraction. What brought him from the bottom of a very long queue to my must complete pile was his face...in particular his snarl.  I don't know why I haven't noticed it before but I instantly fell in love with it and wanted to paint him right away.  He obvoulsly has a long way to go but don't be surprised to find him finished before the others.  My hobby A.D.D. causes me to do strange things like put aside miniatures that are 99% complete in favor of another that has been barely started. 

Miniature:  Mikal  HFO004
Status:  Basecoating
Progress: 15%

OK.  That's it for this month.  I need to stop writing and start painting.  There are ten miniatures that desperately need my attention.

As always, thanks for reading!


Thursday, September 12, 2013

Bombur

I'm still officially on a break from my Thorin & Co. project.  But when I sat down at the desk the other night to finish my previous miniature, I realized that Bombur was nearly complete.  All I needed to do was add a few highlights to move him out of the painting queue.  So I made an exception to my forced hiatus from those pesky Tolkien dwarves and polished off the big guy.


Bombur had zero lines in the theatrical release of The Hobbit: An Unexpected Journey (perhaps that will change with the upcoming extended edition).  It seems like all he did was eat.  Just like the lines on that jolly dwarve's script, my screen is pretty much blank when it comes to talking about the miniature.  It's a fine sculpt, for sure, and GW did a good job rendering the likeness of Bombur onto the mini, but that's all I got.  There's simply nothing special about Bombur or my paint job.  So instead of my usual running commentary, I'll just end here and leave visitors with a few more photos. 

I need some inspiration to finish off the last four dwarves.  Any ideas to get my dwarven groove going?

As always though, thanks for reading!!!