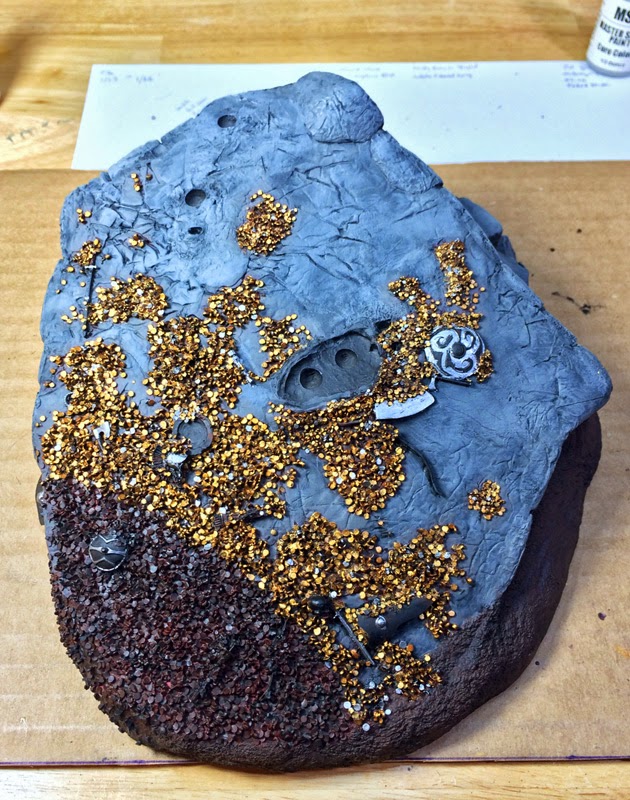
OK. This is it. This post will be the last WIP for the base. The next will not go up until the base is completely finished and the dragon is ready to be mounted.
All the gold coins have been painted. Each and every little coin was done by hand. Though I was tempted (OK, very tempted at the end), I was able to avoid drybrushing. It took forever but I'm glad I stuck with my original plan.
All that is left to do now is go back and change a few of the gold coins to silver to break up the monotony of gold. That shouldn't take me very long. A good number were already completed at the last WIP post. Plus I'm keeping the total number of silver coins fairly low.
A bit more work does need to be done to the rest of the base, however. The stone needs two additional layers of highlighting and then some weathering. The weapons have only received basecoats so they will need some more work as well. The gravel will require the most attention though. I plan to layer up to a rather light brown then attach a significant amount of flock and foliage.
Though I did not take photos, the dragon has also received several basecoats. Whenever I needed to rest my poor eyes from painting tiny coins I would work on the dragon. Before I knew it the dragon was prepped, primed, and coated in dark red. I like it when work gets done without effort. I just wish that would happen more often. Once the base is finished I will start working on him full time. He is MASSIVE!
This project is taking up a large portion of my hobby time but I have not abandoned the rest of my miniatures. I just completed a hobbit for the LotR SBG and a pirate for LotHS. I'll post photos of both minis soon.
Thanks for checking in on the WIP and thanks for reading!
Showing posts with label Dragons. Show all posts
Thursday, May 29, 2014
Friday, April 18, 2014
DSM Dragon Diorama WIP: Of Bases and Coins
Work continues on the base of my Dark Sword Miniatures Elmore Dragon Diorama. The work has been tedious and at times rather boring. But I know I'll be happy with the end result when it is finally completed. Slowly but surely the treasure horde is coming along.
I've kept to my goal of not drybrushing the coins. Each coin thus far has been painted separately by hand. I'm glad I have done so. Though it may be difficult to tell from these low resolution iPhone photos, the coin horde is quite striking to the eye. I do have to admit however that I am doing it the hard way. Each coin, or stack of coins, has to be painted from several different angles. I usually start with the top of the coin, then I hold the base at eye level and rotate it around, brushing on color where needed. Otherwise the coins would look two dimensional without their sides painted. Drybrushing the coins first, followed by the stone gray color probably would have solved this problem. But I truly think the effect would be much less dramatic.
As I mentioned a few weeks ago, most of the coins are/will be gold in color. As you can see in the photos, the gold really does contrast nicely with the gray. However, to break up the mass of gold I decided to add a few silver coins here and there. The effect is subtle but does the job nicely. When I finally get around to painting the assorted weapons and armor included in the treasure pile, the golden mass will be broken up even more.
I've dry fitted the dragon to the base. Wow! I had forgotten how massive theminiature megature really was. The vast majority of the base will be covered by his body while the dragon's impressive wingspan will drape most of the treasure hoard in shadow. These factors lead me to wonder if I am wasting my time by painting all the individual coins, especially when I will be the only person to really appreciate the detail. What do you think?
I guess I should get back to painting coins. I estimate that I'm a little over halfway finished. Hopefully updated photos will be posted soon.
Thanks for reading!
I've kept to my goal of not drybrushing the coins. Each coin thus far has been painted separately by hand. I'm glad I have done so. Though it may be difficult to tell from these low resolution iPhone photos, the coin horde is quite striking to the eye. I do have to admit however that I am doing it the hard way. Each coin, or stack of coins, has to be painted from several different angles. I usually start with the top of the coin, then I hold the base at eye level and rotate it around, brushing on color where needed. Otherwise the coins would look two dimensional without their sides painted. Drybrushing the coins first, followed by the stone gray color probably would have solved this problem. But I truly think the effect would be much less dramatic.
As I mentioned a few weeks ago, most of the coins are/will be gold in color. As you can see in the photos, the gold really does contrast nicely with the gray. However, to break up the mass of gold I decided to add a few silver coins here and there. The effect is subtle but does the job nicely. When I finally get around to painting the assorted weapons and armor included in the treasure pile, the golden mass will be broken up even more.
I've dry fitted the dragon to the base. Wow! I had forgotten how massive the
I guess I should get back to painting coins. I estimate that I'm a little over halfway finished. Hopefully updated photos will be posted soon.
Thanks for reading!
Labels:
Dark Sword Miniatures,
Dragons,
Larry Elmore,
Miniatures
Monday, March 10, 2014
Beginnings: DSM Dragon Diorama WIP
It has been said that from humble beginnings come great things. Well, I'm unsure about the 'great' part but I certainly have started off my next project in a humble manner. After sitting in an unprimed state for months, I have finally put a layer of paint on the base of my Dark Sword Miniatures dragon diorama Kickstarter that I backed last year. The excitement of DSM's current Kickstarter project bubbled over and vanquished the painting lethargy I've been suffering through for the last few weeks.
For this project, I decided to start with the base this time instead of the miniature, as I normally do. Two reasons drove me to this decision. First, in this case the base is very much part of the miniature instead of just an afterthought. I will not say that it is the focal point (the dragon obviously serves in that role quite admirably) but for the diorama to come to life and provide the proper backstory to honor Larry Elmore's iconic painting, the base needs to be nearly as impressive as the dragon itself. To say that I will need to spend quite a bit of time on the base to make it so would be a huge understatement. The second reason deals with logistics. The dragon is huge! I do not have the proper equipment available to mount it for painting. By completing the base first, I can use it to securely hold the dragon during the construction and painting process. I will just need to be extra careful not to damage or ruin the already painted base while working.
My plan of attack is simple. I've already cleaned, primed, and thrown down the initial base colors to give me a good starting point. The dirt/grassy area around the stone was given several coats of a mid-range brown for a base. I will darken some areas and lighten others to give an overall impression of scattered dirt and rocks. Much of this area will be eventually flocked with grass and shrubbery so I'm not overly concerned with this particular portion of the model. The stone however will play a much more important role. I have an initial coat of Reaper Shadowed Stone (9085) covering the rocky areas. After a few light washes to bring back some of the detail, I will slowly bring up the mid-tones and highlights with successive layers of Stone Grey (9086) and Weathered Stone (9087). Then comes the hard part: the treasure.
The coins will take me some time but I'm looking forward to the challenge. I will not say that I will paint each and every one by hand but I do plan on avoiding drybrushing as much as possible to really concentrate on the detail. I plan on most of the coins being gold in color for two reasons. In literature and popular media, dragon hoards always seem to be comprised of gold coins. It's an iconic image that I do not plan on tinkering with. Second, even if silver were the preferred color of a dragon's treasure, I would still choose gold. The gold coins will contrast much better with the grey stone than silver. I do plan on mixing the treasure up a bit though. I'll add silver and copper here and there in small patches to break up the golden monotony.
As a basecoat for the gold coins I chose a deep red - Bloodstain Red (9133) to be exact. I can't remember where I learned the technique, but basing gold, copper, and brass metallic colors with a deep red will produce much more vivid and rich hues than when applied over black or white. I use this technique every time and have been quite pleased with the results. Try it and see if you notice a difference.
So that's it for now. I have thousands of coins to paint. I will post another update once I get a little further along.
One last thing though: today is the last day of the Dark Sword Miniatures G.R.R.M. Masterworks line Kickstarter. Lots of backer rewards have been unlocked over the course of the drive and the total number of included miniatures is now up to 24. That's more than double the initial offering. Plus lots of great add-on deals are also available. Go have a look at the funding page here before it ends tonight at 11pm (EDT).
Thanks for reading!
For this project, I decided to start with the base this time instead of the miniature, as I normally do. Two reasons drove me to this decision. First, in this case the base is very much part of the miniature instead of just an afterthought. I will not say that it is the focal point (the dragon obviously serves in that role quite admirably) but for the diorama to come to life and provide the proper backstory to honor Larry Elmore's iconic painting, the base needs to be nearly as impressive as the dragon itself. To say that I will need to spend quite a bit of time on the base to make it so would be a huge understatement. The second reason deals with logistics. The dragon is huge! I do not have the proper equipment available to mount it for painting. By completing the base first, I can use it to securely hold the dragon during the construction and painting process. I will just need to be extra careful not to damage or ruin the already painted base while working.
My plan of attack is simple. I've already cleaned, primed, and thrown down the initial base colors to give me a good starting point. The dirt/grassy area around the stone was given several coats of a mid-range brown for a base. I will darken some areas and lighten others to give an overall impression of scattered dirt and rocks. Much of this area will be eventually flocked with grass and shrubbery so I'm not overly concerned with this particular portion of the model. The stone however will play a much more important role. I have an initial coat of Reaper Shadowed Stone (9085) covering the rocky areas. After a few light washes to bring back some of the detail, I will slowly bring up the mid-tones and highlights with successive layers of Stone Grey (9086) and Weathered Stone (9087). Then comes the hard part: the treasure.
The coins will take me some time but I'm looking forward to the challenge. I will not say that I will paint each and every one by hand but I do plan on avoiding drybrushing as much as possible to really concentrate on the detail. I plan on most of the coins being gold in color for two reasons. In literature and popular media, dragon hoards always seem to be comprised of gold coins. It's an iconic image that I do not plan on tinkering with. Second, even if silver were the preferred color of a dragon's treasure, I would still choose gold. The gold coins will contrast much better with the grey stone than silver. I do plan on mixing the treasure up a bit though. I'll add silver and copper here and there in small patches to break up the golden monotony.
As a basecoat for the gold coins I chose a deep red - Bloodstain Red (9133) to be exact. I can't remember where I learned the technique, but basing gold, copper, and brass metallic colors with a deep red will produce much more vivid and rich hues than when applied over black or white. I use this technique every time and have been quite pleased with the results. Try it and see if you notice a difference.
So that's it for now. I have thousands of coins to paint. I will post another update once I get a little further along.
One last thing though: today is the last day of the Dark Sword Miniatures G.R.R.M. Masterworks line Kickstarter. Lots of backer rewards have been unlocked over the course of the drive and the total number of included miniatures is now up to 24. That's more than double the initial offering. Plus lots of great add-on deals are also available. Go have a look at the funding page here before it ends tonight at 11pm (EDT).
Thanks for reading!
Subscribe to:
Posts (Atom)