Although work and life are keeping me busy in general, I have still been able to put in a few hours here and there at the hobby desk to work on several projects. Even though I mentioned in the last two posts that I have lost a bit of steam with Thorin and Company, I continue to chip away at the dwarves little by little while working on other miniatures. The latest of Thorin's companions to be completed is Balin, son of Fundin.
While Balin is not the best sculpt in the Escape from Goblin Town set, he is by no means the worst (that distinction still belongs to the hideous Fili sculpt). The facial features of the mini are very well done and for the most part captures the look of the movie. The garb is another high point of the sculpt. Even thought the mini is plastic, GW managed to create a sense of multiple layers of fabric, which in turn gives a sense of richness of dress.
The low points for me are the stance and the hands. Something about Balin's pose just doesn't do it for me. It almost seems unnatural the way he is holding his weapon as if ready to strike, yet appears to be in a relaxed mode. I can't put a finger on it exactly what dampens my enthusiasm for the mini... unless perhaps the stance is lacking in kinetic energy. I can however point out what bothers me about the hands. They look huge compared to the rest of the mini. I'm sure the disproportionate size has something to do with the limitation of plastic minis in general, so I'm not knocking the sculpt just on those grounds. But it does bother me nonetheless.
Just like with Dori, I had a difficult time painting the many different shades of red in Balin's garb. Looking at the movie stills, it's readily apparent that Balin is richly dressed with several layers of clothing. Unfortunately, each layer seems to be only a slightly different shade of red, or the same shade but made of a different material. Either way, the multiple layers of clothing on the screen is easy to discern. Balin's garb presents as overall red but we all see the different layers with little effort. On the miniature however, the eye would have trouble differentiating the subtle changes of shade. To account for this, I chose to change the colors around a bit and add in some freehand work to create distinct edges between the different garments. While I'm not completely happy with the result, I can live with it for tabletop gaming.
I'm also not very pleased with the freehand on the collar and sleeve hems. I use the term "freehand" very loosely by the way, since I have never been very good at it. My attempt was to paint a vague dwarven geometric pattern in the form of reversed triangles. In most cases the outcome was more like blobs of black paint instead of dwarvish design. Not only did the pattern not come out as planned, I'm also disappointed in the starkness/contrast. I should have used a burnt brown or similar color so that the overall effect would have been more subdued. Instead, my dwarvish blobs scream "look at me!" More than likely, once I finally get all the dwarves completed, I will return to this miniature and repaint the collar and sleeves.
Anyhow, at least the miniature is now complete. Soon he will join his companions on the table and win great renown. In time, with many battles behind him, he will become Balin, son of Fundin, Lord of Moria: Balin Fundinul Uzbad Khazad-Dûmu
Monday, May 27, 2013
Friday, May 03, 2013
Dwalin the Dwarf
Another week, another dwarf. Though I said I was going to take a break from the Thorin & Company project for a while, I was still able to complete yet another member and take one more step to finally putting the dwarves behind me.
I'm still in my little slump so just as with Dori, I will refrain from the painting cometary. There is not much to say about him beyond the fact that of the dwarves included in the set, Dwalin is one of my favorite sculpts.
Hopefully with the break I intend to take from Thorin & Company, I'll get some of my enthusiasm back for The Hobbit miniatures. If not, I have tons of other painting projects to keep me busy for decades.
My apologies for the sluggishness of the posts and indifference to the material.
As always, thanks for reading.....
Sunday, April 28, 2013
Dori the Dwarf - Late But Not Forgotten
When I posted Nori two weeks ago, I mentioned he was the last of the Dori, Nori, Ori trio to be completed. Technically that was true. However, I failed to photograph the older sibling and post him online. Somehow he was lost in the shuffle and I did not realize the omission until it was pointed out to me by another reader. So here he is.... Dori the dwarf.
I'll forgo my normal painting commentary. To be honest, there's just not that much to talk about with Dori. He's certainly not my best work and I'm finding it hard to get excited about Thorin and Company these days. It seems like I've been working on them forever. I think it's time for a change of plans...
As always, thanks for reading. Or in this case, some reading and mostly looking....
Thursday, April 11, 2013
Nori the Dwarf
The Great Priming Project of 2013 is nearing a conclusion as the tropical humidity builds day by day. And while my attention has mostly been focused on priming as many miniatures as I can before my weather window closes, I couldn't stay away from painting. Between projects I have managed to polish off a few miniatures, including another one of those pesky little dwarves.
Nori is the middle brother of the Dori, Nori, Ori trio but I painted him last of the three. I was reluctant to paint this particular miniature because, to be honest, I really hated his hair in the movie. I do realize that Peter Jackson had to make each of the thirteen dwarves very different so the audience could easily differentiate between them on the big screen, but I felt he went overboard on Master Nori. The strange triangular hairdo just doesn't do it for me. He wasn't going to paint himself however, so I eventually gave in. Here is the completed mini.
There's not much to say about the painting style. I mostly followed the GW guide as far as his garb and armor are concerned. I did make a minor change here and there but those changes are not readily apparent. I'm not a huge fan of washes but I did use quite a bit of Delvan Mud on Nori to soften the appearance of both the light and dark brown leather. I also used the same wash to tone done his hair and bring it more in line with his little brother Ori. Other than that, I painted by the book....or the magazine article in this case.
Not only have I finished Nori, but Balin and Dwalin are complete as well. I'll try to get those photos posted in the very near future.
Thanks for reading....
Nori is the middle brother of the Dori, Nori, Ori trio but I painted him last of the three. I was reluctant to paint this particular miniature because, to be honest, I really hated his hair in the movie. I do realize that Peter Jackson had to make each of the thirteen dwarves very different so the audience could easily differentiate between them on the big screen, but I felt he went overboard on Master Nori. The strange triangular hairdo just doesn't do it for me. He wasn't going to paint himself however, so I eventually gave in. Here is the completed mini.
There's not much to say about the painting style. I mostly followed the GW guide as far as his garb and armor are concerned. I did make a minor change here and there but those changes are not readily apparent. I'm not a huge fan of washes but I did use quite a bit of Delvan Mud on Nori to soften the appearance of both the light and dark brown leather. I also used the same wash to tone done his hair and bring it more in line with his little brother Ori. Other than that, I painted by the book....or the magazine article in this case.
According to some of the background literature I found on the movie version of the dwarves, Nori is characterized as a bit of a rogue. Apparently he left home at an early age and lived a nomadic life, "living off the land and off his wits." It is also said that his expertise at foraging sometimes "crosses the line, and becomes theft."
Now I am definitely a lore nerd when it comes to Tolkien and Middle-earth. And though I love the movies, if given a choice, I will always side with the Professor's written word. However, since little is said of the individual dwarves of Thorin's company in the lore, I'm mostly OK with Mr. Jackson developing the background of each dwarf to give them a bit of personality. I'm actually excited to see how Nori's questionable past will play out in the next two movies.
Thanks for reading....
Thursday, March 28, 2013
A Game of Thrones Beer Pong Table
When you play the game of thrones, you win or you die drink.
I have finally finished my Song of Ice and Fire/Game of Thrones beer pong table. I started working on it late last year but then put it aside for several months to work on other projects. Now with the start of the third season of HBO's adaption of George R. R. Martin's A Song of Ice and Fire series, it seemed like an appropriate time to finish up.
For those not familiar with beer pong, it's a beer drinking game (though nonalcoholic beverages can be used instead) which features two teams trying to throw ping pong balls into beer filled cups from the opposite edge of the table. When a pong ball lands in the opposing team's cup (8-10 cups arranged like a pool ball rack is the norm), that cup is consumed then removed. Once all of a team's cups have been removed from play, that team is out and the opposing team is declared the winner (though in my mind, maybe it's not so bad to be the loosing team since you get to drink the beer). There are plenty of additional rules (and house rules) but that is the core of the game.
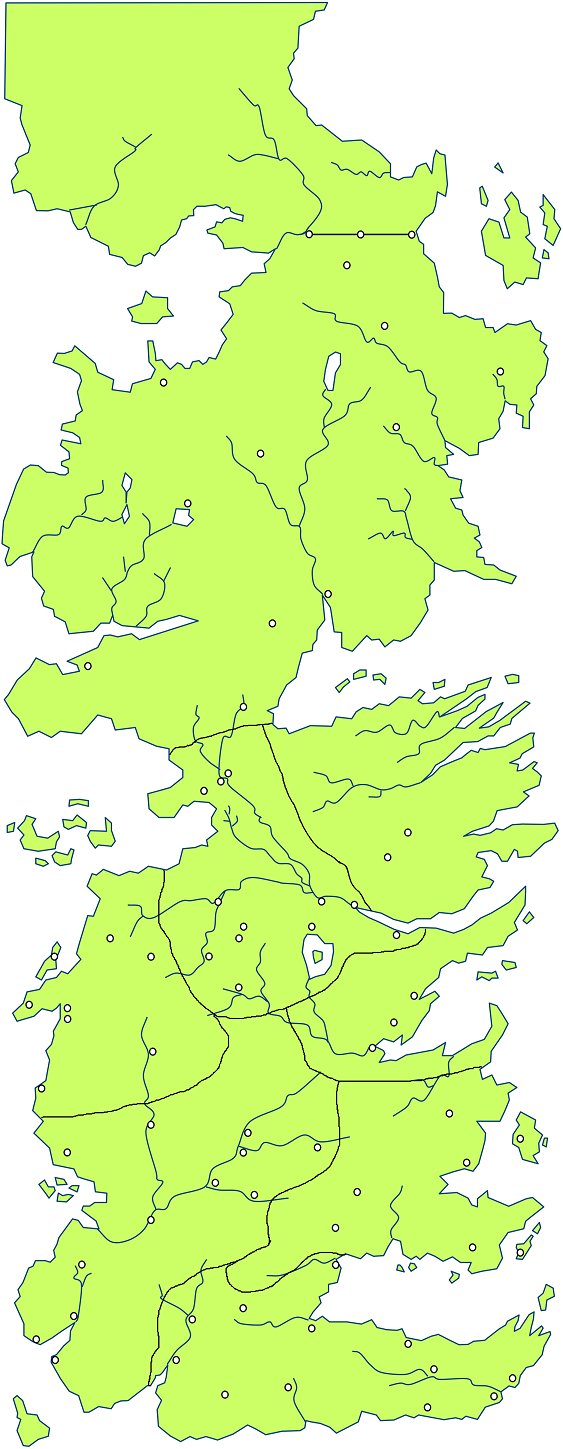
I knew all along that I wanted to make a Westeros themed table. I just wasn't sure exactly what I wanted to represent. At first I thought that a map of Westeros itself would make a great backdrop. The landmass from The Wall down to Dorne would fit very nicely on my 2x8 rectangle due to the shape of the continent of Westeros. The idea was abandoned early in the planning process however. Though I am a huge fan of the books, I didn't think that at first glance most people, including those I play with, would make the connection between the imagery of the geography on the table and A Game of Thrones television series(which they were familiar with). I wanted to take advantage of the atmosphere and branding the HBO adaption has created so I decided to use the house sigils popularized by HBO instead.
To create the sigils of some of the great houses of Westeros, I started with the shields. I first made a template to insure that each shield was the same shape and size. I then outlined them on the table itself. Then it was on to painting the backgrounds, which did take quite a bit of time. Several layers of acrylic paint were used to cover the dark stain with the appropriate house color, so four cycles of painting and drying were needed . The next step was the most difficult. I drew each design by hand on paper first, then cut out a template to trace onto the shield. Some of the designs like House Baratheon, and House Targarian in particular, were a real pain to cut out due to all the small features. With a craft knife and a steady hand, I was able to do so however, with only minor mistakes. To finish up, all I had to do was paint between the lines just like we were all taught to do back in grade school.
As a final step, I applied several coats of sealer to help protect the surface from the sun, weather, and the inevitable spillage of beer. A water based sealant was used instead of a stronger oil based version to help protect the paint. I was afraid the latter would cause the acrylic to bleed or peel up. If I had it to do over though, I would have applied an oil based sealant after staining, then paint the sigils over the stronger sealant. I could then go back and apply additional water based sealer on the painted areas themselves. Oh well.....
So my Game of Thrones table now sits proudly in my man cave ready for action. The lords and ladies of the Seven Kingdoms may prefer the joust for entertainment in between their planning and scheming to win the Iron Throne but for me, I'll take a good game of beer pong with my friends any day. Come on over and play but remember: as Craster would say, "My house, my rules." Ha, ha, ha.......
Thanks for reading......
I have finally finished my Song of Ice and Fire/Game of Thrones beer pong table. I started working on it late last year but then put it aside for several months to work on other projects. Now with the start of the third season of HBO's adaption of George R. R. Martin's A Song of Ice and Fire series, it seemed like an appropriate time to finish up.
![]() |
| Some of the sigils of the great houses of Westeros adorn the table. |
For those not familiar with beer pong, it's a beer drinking game (though nonalcoholic beverages can be used instead) which features two teams trying to throw ping pong balls into beer filled cups from the opposite edge of the table. When a pong ball lands in the opposing team's cup (8-10 cups arranged like a pool ball rack is the norm), that cup is consumed then removed. Once all of a team's cups have been removed from play, that team is out and the opposing team is declared the winner (though in my mind, maybe it's not so bad to be the loosing team since you get to drink the beer). There are plenty of additional rules (and house rules) but that is the core of the game.
I was introduced to beer pong last year by some of my boat crew. Due to the nature of my business, my boat crews tend to be fairly young, with many just out of college. They couldn't wait to share with the "old guy" their favorite college drinking game. Now we had our share of games in my days, but they mostly involved cards or quarters. So this one was going to be quite different. Although according to reports, beer pong has been around on college campuses since as early as the 1960s, during my college years (1990s) it had not caught on and was not as popular as now. The concept intrigued me so I let the "youngins'" show me how to play and explain all of the esoteric and crazy house rules. I'm pretty sure they took advantage of me that night but all in all it was great fun. I was hooked!
![]() |
| Rinse cup holders were added to each team's side. |
The table we used that first night (and many nights thereafter) was a sorry affair. Basically they took a thin piece of plywood and threw on a coat of paint. It didn't even have legs.....just a pair of sawhorses held the table up. It was in bad shape even then but the weather and humidity of the Florida Keys took a toll. The peeling paint basically disintegrated and the wood warped to such a degree that one could almost toss a pong ball to the side and have it bounce in for a bank shot. That's when I decided take make my own version.
![]() |
| House Tully and House Stark are aligned on the left side of the table. |
Not to be outdone by the kids, I decided to build a bullet proof version. I did a little research online and discovered that not only are there official beer pong leagues with a world championship in Las Vegas, but official beer pong table dimensions as well. Two feet wide by eight feet long are the official specs so I decided to adopt those measurements. I chose half inch plywood for the table itself then attached 2x4 runners down each side to keep the playing surface strong and level. I also ran several 2x4 struts underneath to give additional strength and longevity to the table top. 2x2 legs approximately 28" high were then attached to hold the table up to the official height. Not required and probably not official, I also added rinse cup holders on each team's side. This thing was heavy, to say the least, but the table would definitely last.
![]() |
| House Targaryen stands proudly in the center. |
With the table constructed, I applied a few coats of dark stain to help protect the wood from the elements. I wanted the wood to look old and well worn, so a rag was used to stain the table and I let the excess gather in random places to create a bit of a pattern. After the staining process, it was time to start painting.
![]() |
| House Baratheon and House Lannister guard the right side of the table. |
I knew all along that I wanted to make a Westeros themed table. I just wasn't sure exactly what I wanted to represent. At first I thought that a map of Westeros itself would make a great backdrop. The landmass from The Wall down to Dorne would fit very nicely on my 2x8 rectangle due to the shape of the continent of Westeros. The idea was abandoned early in the planning process however. Though I am a huge fan of the books, I didn't think that at first glance most people, including those I play with, would make the connection between the imagery of the geography on the table and A Game of Thrones television series(which they were familiar with). I wanted to take advantage of the atmosphere and branding the HBO adaption has created so I decided to use the house sigils popularized by HBO instead.
![]() |
| Painting the shields. And yes, that lamp did fall over a bit after this photo was taken. |
To create the sigils of some of the great houses of Westeros, I started with the shields. I first made a template to insure that each shield was the same shape and size. I then outlined them on the table itself. Then it was on to painting the backgrounds, which did take quite a bit of time. Several layers of acrylic paint were used to cover the dark stain with the appropriate house color, so four cycles of painting and drying were needed . The next step was the most difficult. I drew each design by hand on paper first, then cut out a template to trace onto the shield. Some of the designs like House Baratheon, and House Targarian in particular, were a real pain to cut out due to all the small features. With a craft knife and a steady hand, I was able to do so however, with only minor mistakes. To finish up, all I had to do was paint between the lines just like we were all taught to do back in grade school.
As a final step, I applied several coats of sealer to help protect the surface from the sun, weather, and the inevitable spillage of beer. A water based sealant was used instead of a stronger oil based version to help protect the paint. I was afraid the latter would cause the acrylic to bleed or peel up. If I had it to do over though, I would have applied an oil based sealant after staining, then paint the sigils over the stronger sealant. I could then go back and apply additional water based sealer on the painted areas themselves. Oh well.....
So my Game of Thrones table now sits proudly in my man cave ready for action. The lords and ladies of the Seven Kingdoms may prefer the joust for entertainment in between their planning and scheming to win the Iron Throne but for me, I'll take a good game of beer pong with my friends any day. Come on over and play but remember: as Craster would say, "My house, my rules." Ha, ha, ha.......
Thanks for reading......
Tuesday, March 19, 2013
It's Prime Time Baby!!
It's that time of year again friends. It's not what you're thinking though. Despite the title of the post (which I said in a very horrible impression as I typed it) and the photo below, I'm not writing about March Madness. Although I'm a huge fan of The Big Dance and will probably be watching the tournament more than painting over the next few weeks, I'm actually referring to the change in the weather here in the Florida Keys.
Here on this tiny string of tropical coral islands, the dry season is rapidly drawing to a close. The daily rain is about to return and along with it, constant high humidity. As one can imagine, such conditions provide a very unfavorable environment for spray priming miniatures outside. Although when you're surrounded by water humidity is always present, for a few months each year the percentage comes down enough to allow me to use a spray primer. I do have a method for hand priming miniatures during the rainy season but it's time consuming when prepping more than one or two models. So every year about this time I seem to realize that my window for spray priming is coming to an end and then I go all out to prime just about everything I can get my hands on before the humidity returns. Prime time indeed!
I took a quick photo with my phone to show an example of some of the work that has occupied my time during the last week as I scramble to beat the humidity. In the upper portion of the pic you can see some of the recently primed miniatures. There are some random Reaper miniatures and a few LotR models, but most of the batch is comprised of goblins from Otherworld Miniatures. The goblins have a great "old school" look to them without the static poses and poor details characteristic of minis cast back in the day. I can't wait to paint them.
The lower portion of the photo shows miniatures that have recently been cleaned, washed, and assembled. They are awaiting the end of a rare rain event for this time of year so that they can be primed as well. Many of the minis from this batch are from Dark Sword Miniatures. Any regular reader of this blog probably knows how much I love the dynamic sculpts and incredible detail from DSM, but I very much dislike putting the models together. To be able to produce those great poses, the miniatures usually arrive in quite a few pieces. The parts themselves are rather small and flimsy and are difficult to glue into position. Ironically, I often find myself cursing DSM for the very reason that I love them. All will be well once I start painting them however.
Besides the miniatures in the photo above, I have quite a few more to prep before they even get to the cleaning and assembly stage. I'm a bit of an obsessive collector and tend to hoard way more miniatures than I'll ever be able to paint. I have no doubt that one day I'll be featured on the television show Hoarders where I'll be seen surrounded and trapped by mounds of lead and plastic. Before the humidity makes a return, I need to put a major dent in some of that hoard.
Amongst some of the items to tackle are several boxes of Rangers of Middle-earth, two boxes of dwarves, a box each of Easterlings and Haradrim, two each of Anglo-saxons and Vikings, and several resin pieces. That list does not even account for the huge box of miniatures that should arrive before long from the Reaper Bones kickstarter. Plus I have about 15 metal minis on the way in from Ebay. Busy will be the word of the day for the next few weeks. "I love the smell of primer in the morning." What does not get primed before the end of April will just have to wait until late next November when the air dries out a bit and the dry season arrives again. If I purchase something new in the meantime that I simply must paint before the fall, I'll just slap on a coat of Guesso and get right to it.
Thanks for reading my update folks. Now it's off to work on more miniatures and finish up my NCAA basketball bracket!
Wednesday, March 13, 2013
Ori the dwarf
Due to the lack of posts lately, it may look like my Thorin & Company project has come to a standstill, but that is not the case. I've just been too lazy to post anything. I'm actually almost done (finally) and simply need to catch up with my photography and posts to polish off Thorin and the boys. To further that goal, here is Ori the dwarf.
Once I finally decided on an appropriate color, Ori was fairly easy to paint. His garb is simple and he does not carry all that much equipment. But deciding on a color was not fun. Trying to match the tunic as it appears in the movie photography took several tries. The color seemed to be halfway between red and purple. Simple right? Just mix the two and there ya go. Not so fast there cowboy.
No matter how I changed the ratios, I kept coming up with a very brownish burgundy. I now think I should have tried to add a bit of blue to "cool" off the color a bit but I didn't think of it at the time. Instead I gave up and searched the internet for a premixed color that matched what I was looking for.
As most of you know, ordering paint online by looking at a color swatch can be an exercise in frustration. It seems that the paint bottle in question rarely matches the color shown online. I know that I have certainly been disappointed in the past when an order arrived only to be the wrong color. Fortunately, that was not the case this time. I ordered Burgundy Wine (09025) from Reaper and the match was nearly perfect for what I wanted. I used the color as is for the basecoat then added reds and purples to create highlights and shades. I could have lightened up the overall pallet just a bit to brighten the miniature but for the most part, I'm quite happy with the final colors.
I'm feeling rather lazy again so that's all for now. Thanks for reading......
Once I finally decided on an appropriate color, Ori was fairly easy to paint. His garb is simple and he does not carry all that much equipment. But deciding on a color was not fun. Trying to match the tunic as it appears in the movie photography took several tries. The color seemed to be halfway between red and purple. Simple right? Just mix the two and there ya go. Not so fast there cowboy.
No matter how I changed the ratios, I kept coming up with a very brownish burgundy. I now think I should have tried to add a bit of blue to "cool" off the color a bit but I didn't think of it at the time. Instead I gave up and searched the internet for a premixed color that matched what I was looking for.
As most of you know, ordering paint online by looking at a color swatch can be an exercise in frustration. It seems that the paint bottle in question rarely matches the color shown online. I know that I have certainly been disappointed in the past when an order arrived only to be the wrong color. Fortunately, that was not the case this time. I ordered Burgundy Wine (09025) from Reaper and the match was nearly perfect for what I wanted. I used the color as is for the basecoat then added reds and purples to create highlights and shades. I could have lightened up the overall pallet just a bit to brighten the miniature but for the most part, I'm quite happy with the final colors.
Ori did not get much attention in the movie. One of the only lines that comes to mind is during the meeting at Bag End when bravado (or perhaps the ale from Bilbo's stock) gets the best of him and causes him to blurt out "I'm not afraid! I'm up for it. I'll give him a taste of the Dwarvish iron right up his jacksy." I got quite a chuckle from that line!
Despite his lack of attention from Peter Jackson, he certainly garnered quite a bit from me during his time in the painting queue. I'm glad he is done!
Tuesday, February 26, 2013
Oin
Here's yet another member of Thorin & Company.....Oin, son of Groin. Thorin's companions continue to grow and I can actually see light at the end of this long painting tunnel. The signs and portents speak of a completed project in the not too distant future.
In The Hobbit: An Unexpected Journey, Oin doesn't get much on-screen time. While he does have more lines than Bombur (it's not a difficult task considering that Bombur does not even speak the entire movie), he does not have much to say beyond telling the company about the portents that suggest Smaug might be dead or ready to be killed. "Ravens have been seen flying back to the mountain as it was foretold: When the birds of yore return to Erebor, the reign of the beast will end." Since I painted Oin completely in browns ( and a little grey), I really don't have much to say either. He was a fun mini to paint but the color palette was not all that exciting, leaving me with little to comment on.
I am excited about the sculpt however. The details were crisp and prominent and the stance was pleasing to the eye. In addition, I like that he, along with Kili, has his hood on. It's not a big deal, but the hoods were an important part for me growing up reading the book. I remembered the color of the hoods before I got the names of the dwarves right back in those days. I think it's a proper acknowledgement to the Professor that Peter Jackson, and GW in return, kept that part of the book somewhat accurate.
Oin can now stand beside his brother Gloin in the display case. Then one day, after the dwarves are finished and I power through all those goblins in the Escape from Goblin Town box set, I can finally sit down to a proper wargame with the miniatures.
Thanks for reading.....
Monday, February 18, 2013
Gloin - Baby Daddy of Gimli
I'm still working on those darn dwarves. Will the insanity never end? As I continue to paint, I'm also in the process of photographing and posting the completed furry-faced fellas. Today I offer Gloin, son of Groin, and the father of John Rhys-Davies (also known as Gimli).
I have mentioned before that, with the exception of Fili (which is an absolutely horrible model), GW did a wonderful job on the miniatures in the Escape from Goblin Town set. Gloin is a well-detailed mini with an exceptionally pleasing dynamic pose. With legs spread and arms poised for battle, one can almost sense the kinetic energy built up in the sculpt. Gloin is definitely one of my favorites in the set.
The under-tunic was painted with Reaper reds. Deep Red (09002), Blood Red (09003), and Fire Red (09004) resulted in a deep rich red hue that suggests a fairly nice item of clothing. Though the movie makes much of the fact that the dwarves were without a home, it must be remembered that according to the books, the dwarves abiding with Thorin before the Quest of Erebor did rather well for themselves and would have had access to above average garb. Just as the under-tunic needed to look warm and vibrant, I tried to do the same for the trousers. I basically started with Highland Moss (09083) and fudged the color up and down for the shadows and highlights to suggest a material of higher quality.
I have mentioned before that, with the exception of Fili (which is an absolutely horrible model), GW did a wonderful job on the miniatures in the Escape from Goblin Town set. Gloin is a well-detailed mini with an exceptionally pleasing dynamic pose. With legs spread and arms poised for battle, one can almost sense the kinetic energy built up in the sculpt. Gloin is definitely one of my favorites in the set.
Painting was fairly straightforward and mostly agreeable to the GW scheme. His armor was basecoated with Dark Flesh. Scorched brown was then mixed in to provide shadows while several flavors of red were added for highlighting. The armor looked pretty good but it needed something else. So I looked at photographs and searched the web for inspiration. My efforts brought me back to the source however. I was very much impressed with the freehand work on the Gloin miniature by the GW painters in the December 2012 issue of White Dwarf. So I attempted to add a bit myself by adding a dwarven themed cross pattern on the armor after the highlight phase. I used a watered-down darkened brown (Walnut Brown from Reaper if I remember correctly) to allow the paint to flow freely from the brush during the freehand. For the most part the technique worked. Though it's tough to see in the photographs due to my washed-out pics, it's much easier to discern in person. I was thinking of going darker but then I would be worried that the effect would be too harsh and not appear to be part of the leather. What do you think?
The rest of the miniature was pretty standard stuff....leather trim, boots, and metallics were all completed using basic colors.
So Gimli's father is now complete and can join Thorin and Bilbo on their trek over the edge of the wild. Hopefully the rest of the company will join them ere the break of day 2014.
Thanks for reading......
Monday, February 11, 2013
Thorin Oakenshield - The Leader of the Company
As promised, I'm starting to post individual photographs of the dwarves I've been able to complete thus far in the Thorin & Company project. Here we have Thorin Oakenshield, son of Thrain.
Those that read this blog know that I'm not a big fan of plastic. Metal is the way to go for me. However, as far as plastic goes, Thorin is a good sculpt. The detail is more than acceptable for this particular medium. The details are crisp except for in a few spots: the armor on the shoulders is rather lacking and the area around the bracers and hands is devoid of much relief. Otherwise, I think Thorin is rather well done. I hate Finecast almost as much as plastic but I'll be interested to see how detailed the resin version will be. Alas for the loss of metal....
I'll not go into much detail on the paint job since the color scheme is rather straightforward. I used Reaper paints throughout, which mostly matched up well with the suggested GW paints. I did choose a slightly different blue to better match the color of Thorin's tunic in the movie photography however.
I have been torn on the subject of basing Thorin & Company. I almost went with a stony "Mines of Moria" base to better reflect the company's time in Goblin Town. However, the battle scenarios listed in the Goblin Town set will become stale after several games and I thought the miniatures would be more flexible with standard "outdoorsy" bases. I'll need to surf the web a bit to see what others are doing with their bases.
Anyhow, the figure completion count continues to rise for Thorin & Company. I'll try to get Gloin posted a bit later this week.
Thanks for reading.....
Wednesday, February 06, 2013
Thorin & Company Update #4
Yep....still working on those darn dwarves. Hopefully this will be the last update before completion.
As of the end of January, these are the members of the company that have been completed: Bilbo, Thorin, Gloin, Nori, Ori, and Oin. I posted close-ups of Bilbo last week and will try to get the rest of the boys on the blog soon. The photos are already taken. I just need to find time to sit down and post them. Easier said than done these days.....
The next batch are the members of the company that are nearly complete. In fact, I finished Balin last night. Dwalin, Bombur, and Kili need some additional highlighted then they should be good to go.
Finally, Dori, Bofur, Fili, and Bifur are the minis that need the most work. Well, that's not exactly true, Right after I took these photos with my phone the other night I finally figured out a color scheme on Dori that I was happy with and ended up completing him in that sitting. I photographed him with the good camera last night (along with Balin) and will post the completed close-ups of them soon. But the others do need considerable attention...especially Fili and Bifur. I have done very little work with the latter just because he always seems to be at the end of the assembly line. As for the former, if you've read the other updates, then you probably remember why Fili has seen so little attention. Ihate strongly dislike the sculpt so it's hard to get excited about working on him.
So there it is. The second to the last update. I wonder if anyone else is taking this long to finish their dwarves?
Thanks for reading.....
As of the end of January, these are the members of the company that have been completed: Bilbo, Thorin, Gloin, Nori, Ori, and Oin. I posted close-ups of Bilbo last week and will try to get the rest of the boys on the blog soon. The photos are already taken. I just need to find time to sit down and post them. Easier said than done these days.....
The next batch are the members of the company that are nearly complete. In fact, I finished Balin last night. Dwalin, Bombur, and Kili need some additional highlighted then they should be good to go.
Finally, Dori, Bofur, Fili, and Bifur are the minis that need the most work. Well, that's not exactly true, Right after I took these photos with my phone the other night I finally figured out a color scheme on Dori that I was happy with and ended up completing him in that sitting. I photographed him with the good camera last night (along with Balin) and will post the completed close-ups of them soon. But the others do need considerable attention...especially Fili and Bifur. I have done very little work with the latter just because he always seems to be at the end of the assembly line. As for the former, if you've read the other updates, then you probably remember why Fili has seen so little attention. I
So there it is. The second to the last update. I wonder if anyone else is taking this long to finish their dwarves?
Thanks for reading.....
Wednesday, January 30, 2013
Bilbo Baggins - A Baggins of Bag End
I should have titled this post: A Long Expected Update. I've been pretty quiet online lately. For whatever reason, this is only my second post of the month (and just barely at that). While many of my favorite bloggers try to post several times a week, that's way too much for me personally. I don't have the time, and even if I did, I don't think I'd have enough to say to fill the blank screen. I do try to post at least once a week however, but even that has been difficult this month.
Anyhow, here's a quick one to bring up my average for January. Since picking up the Escape from Goblin Town set in December, I've been mostly working on Bilbo and the dwarves. If you've been following my Thorin & Company updates, you can see that the miniatures are coming along at a glacial pace. I have finished almost half but I have yet to publish any close-up photos of the completed minis. I'll remedy that with this post by presenting the miniature I first completed.
For the most part, I followed the general GW color scheme on Bilbo Baggins but chose to use Reaper paints instead. For the jacket, I first started with an undercoat of Clotted Red (09134). This is always my first step when painting reds over black primer. I've found that Clotted Red brings out the vibrancy of the regular reds used in the main palette while reducing the number of coats needed overall. Next I applied Carnage Red (09135) as the basecoat then blended up and down to add the highlights and shadows. In the movie, the coat is rather dark and I wanted to avoid bringing the reds too high in the spectrum and appearing orange-ish (is that even a word?). By adding very small amounts of brown I was able to keep the coat somewhat subdued.
For the trousers, I did use GW's Scorched Brown as the basecoat. I then added a bit of Reaper Intense Brown (09138) to the mix for the highlights and used Blackened Brown (09137) for the shadows. Doing so resulted in a nice soft brown color that suggests a finer weave of cloth for the well-to-do Mr. Baggins.
The vest was basecoated with Reaper's Highland Moss (09083) and simply mixed with other components from their triad system for the next stages. The colors don't always work well together with their triads, but when they do, mixing paints is greatly simplified.
After undercoating with a mid-level brown, I finished up with a coat of Chestnut Gold (09073) on the scarf. Several coats of brown wash followed by additional applications of Chestnut Gold resulted in a deep, richly colored scarf. I was going to apply a bit of freehand on the scarf to add some detail to an otherwise plain sculpt, but if I remember correctly, at the time, Christmas was rapidly approaching and I had tons of other real life projects to do.
So that's it for now. I'll try to post the close-ups of Thorin, Gloin, Oin,Ori, and Dori in the next week or so as well as another Thorin & Company update. Hopefully I'll have this project wrapped up soon so that I can move on to other things.
Thanks for reading.....
Saturday, January 12, 2013
Thorin & Company Update #3
First of all, Happy New Year! I can't believe January is almost half over and I have not even had a moment to post an update, much less ring in the New Year with fellow bloggers. It's been a busy one so far for me and I fear it's only going to get worse (which is better I think??) as the year progresses. Big changes are on the horizon....
Anyhow, despite my hectic life for the past few weeks, I have been able to put in a bit of time at the hobby desk. Though it hasn't amounted to much free time, what I have had has been focused entirely on those pesky little dwarves from the Escape from Goblin Town set. Every morning when I wake up, I check on Thorin & Co. hoping that maybe some little painting fairies have finished them for me. Can you imagine my disappointment when that's not the case?
Despite the obvious work strike from the painting faeries, progress continues on the adventuring company. As you can see from the photo, Bilbo and Thorin are basically finished. All I need to do is a bit of base work and then they'll move out of the work queue. Balin, Dwalin, and Gloin will probably be the next three to be completed. I'm getting ready to do some freehand scroll work on Balin's sleeve and coat trim then I'll shade and highlight the beard. Dwalin needs work mostly on his tunic and armor then a bit of minor highlighting. Gloin is nearly complete. His bracers and axe handles need highlighting and that's about it. The last three have had little attention thus far and will be in the queue for some time I think. Fili is taking the longest because truth be told, I really dislike the sculpt. It looks terrible!
The rest of the fellas are moving along very slowly. I'm still playing around with color selection to do justice to Dori's rich velvet tunic and robes and I haven't even started on Nori (except for the face). Really only Bofur and Bombur have received any significant attention in this group, with the big fat boy being the closest to completion.
Hopefully I'll get another update on Thorin & Co. posted within the next week or so. Since most of my basecoating is basically finished, I think the next update will show some significant progress....especially if the painting faeries get off their butts and get to work!
Thanks for reading....
Subscribe to:
Posts (Atom)